Overview
The library is built from our experience of shipping a production ready OTA solution. The library works with latest version of ESP-IDF and will be actively maintained.
Documentation
The documentation of the library can be found here. You may also refer to the OTA user guide to know how to use this library for OTA updates.
Getting started with the library
Follow this article to do provisioning & registering the device on AWS.
Example Setup
- Change the working directory to the OTA example.
- Copy the generated claim certificates from earlier example to
..\<example>\main\claimCertsfolder. - Update the Wi-Fi and AWS parameters in
app_config.hof the example.
Building the project
-
- Open the
ESP-IDF 4.2 CMDcommand prompt - Navigate to
..\<example>folder - Flash Command
idf.py -p <SERIAL_PORT> flash monitor
Note : Don’t erase-flash as device is already registered.
- Open the
Testing OTA Update Job
- Update the APP_VERSION in
app_config.h
#define APP_VERSION "NEW_VERSION" - Open the
ESP-IDF 4.2 CMDcommand prompt - Build the project
idf.py build - Under
..\<example>\build
AWS IOT Setup
1. Upload the new binary to s3 bucket.
create a new bucket
- open the AWS S3 Storage
- In Buckets section, click Create bucket
- Enter a unique name (for example,
aws-ota-buildstorm). - Select the AWS Region
- In Block Public Access settings for this bucket,
- uncheck Block all public access
- In Turning off block all public access might result in this bucket and the objects within becoming public, check I acknowledge that the current settings might result in this bucket and the objects within becoming public
- click Create bucket
upload new binary to S3 bucket
- select the bucket you created in the earlier section
- click upload
- In the Upload section click Add files & select
..\<example>\build\otaS3Bucket.bin- check the otaS3Bucket.bin file to upload

- In the Permissions
- under Predefined ACLs, check Grant public-read access.
- in Granting public-read access is not recommended, check I understand the risk of granting public-read access to the specified objects.
- click Upload
create the Job document
- In objects, click on binary file object(otaS3Bucket.bin)
- Under Object overview section, copy Object URL
- paste the copied URL in esp32OtaCommand.txt file as url string.
- Save and upload this file to S3 bucket (similar to earlier section).
2. Create a custom OTA job.
- Open the AWS IoT console
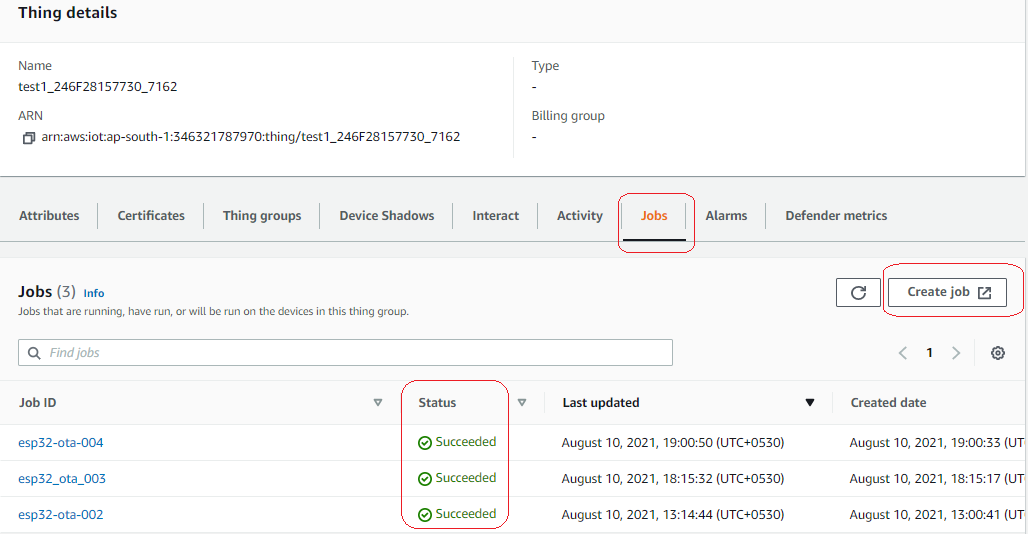
- In the left navigation pane, choose Manage, choose Things, your thing id, choose Jobs, and then click Create job as shown in below image.
- In the Job type section, select Create custom job & click Next
- In the Job properties, Enter a name for the Job_Name (for example,
esp32_ota_001). & click Next - In the File configuration,
- In Job targets, choose the thing to be updated.
- In File, click Browse S3 & select the job document(s3://testforarticle/esp32OtaCommand.txt).
- Click Next
- Under Job run type, choose Snapshot
- Click Submit
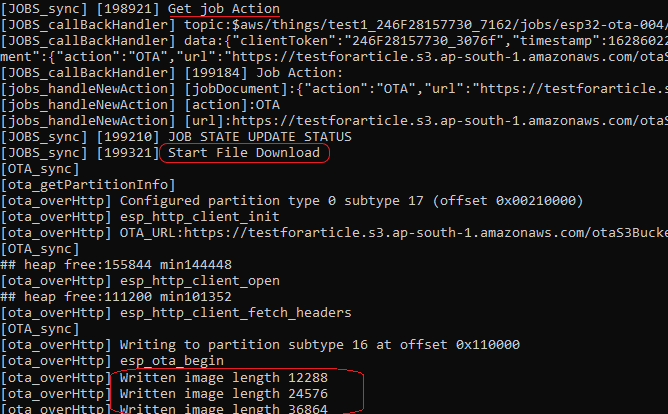
- Device will accept the job, performs the ota and the updates the OTA status to the AWS cloud.
Device OTA logs
The free usage of library is limited to 30 min. It is meant for testing and demonstration only. If you need access to the source code of the library or if you’re looking for a customized solution, reach out at hello@buildstorm.com


