
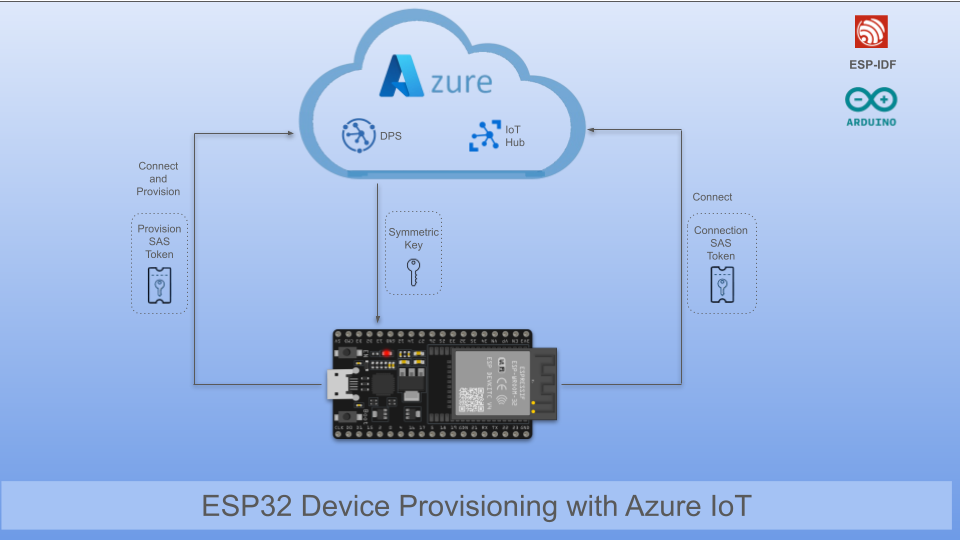
Azure IoT Device Provisioning involves the registration of a device onto the cloud platform, enabling seamless communication and interaction between the cloud and the registered device. Creating an IoT Hub enables us to obtain the necessary credentials. With these credentials, we can then proceed to provision the device.
To provision your devices, you first perform the following steps:
1. Use the Azure portal to create an IoT hub
2. Use the Azure portal to create an IoT Hub Device Provisioning Service instance
3. Link the IoT hub to the Device Provisioning Service instance.
Azure Side
Provisioning setup
Create an IoT hub:
- Sign in to the Azure Portal.
- On the Azure homepage, select the + Create a resource button.
- From the Categories menu, select Internet of Things, and then select IoT Hub.
- Select the subscription to use for your hub.
- Select a resource group or create a new one. To create a new one, select Create New and fill in the name you want to use.
- Enter a name for your hub
- Select the region, closest to you, where you want your hub to be located.
- Select the tier that you want to use for your hub.
- Select the maximum daily quota of messages for your hub.
- Select Next: Networking to continue creating your hub.

- Accept the default settings on the Networking tap.
- Select Next Management to continue creating your hub.
- On the Management tab, accept the default settings.
- On the Add-ons tab, accept the default settings.
- Select Next: Tags to continue to the next screen.
- Select Next: Review + create to review your choices.
- Select Create to start the deployment of your new hub. Once the deployment is complete, select Go to Resource to open the new hub.

Create a new IoT Hub Device Provisioning Service instance:
- In the Azure portal, select the + Create a resource button.
- From the Categories menu, select Internet of Things, and then select IoT Hub Device Provisioning Service.
On the Basics tab, provide the following information:
1. Select the subscription to use for your Device Provisioning
Service instance.
2. Resource group: Choose the same resource group that
contains the IoT hub you created in the previous steps.
3. Name: Provide a unique name for your new Device
Provisioning Service instance.
4. Region: Select a location that’s close to your devices.
- Select Review + Create to validate your
provisioning service. - Select Create to start the deployment of your Device
Provisioning Service instance. - After the deployment successfully completes, select Go to
Resource to view your Device Provisioning Service instance.

Link the IoT hub and your Device Provisioning Service instance:
- In the Settings menu, select Linked IoT hubs.
- Select + Add.
On the Add link to IoT hub panel, provide the following
information:
1. Subscription: Select the subscription containing the IoT hub
that you want to link with your new Device Provisioning
Service instance.
2. IoT hub: Select the IoT hub to link with your new Device
Provisioning System instance.
3. Access Policy: Select iothubowner (RegistryWrite,
ServiceConnect, DeviceConnect) as the credentials
for establishing the link with the IoT hub.
- Select Save.

- Select Refresh. You should now see the selected hub under the Linked IoT hubs blade.

Create a device enrollment
- Select Manage Enrollments from the Settings section of the navigation menu.
- Select the Enrollment groups tab, then select Add enrollment groups.

- On the Registration + provisioning of the Add enrollment group page,
Select the Symmetric key as the Attestation mechanism. - Check the Generate symmetric keys automatically.
- Provide a unique registration ID for the device.
- Check the Enable this enrollment box.
- In the Reprovision policy choose ‘Reprovision device
and migrate current state’. - Select Next: IoT hubs.
- Target IoT hubs: Select your linked IoT hubs.
- Allocation policy: Choose ‘Evenly weighted distribution’.
- Select Next: Device settings.
- IoT Edge: Check the Enable IoT Edge on provisioned
devices. - Select Next: Review + create.

- To view your simulated symmetric key device enrollment, select the Enrollment groups tab.
- Select your device’s registration ID from the list of Enrollment groups.
- Copy the value of the generated Primary key.

Device Side
Try it out
esp32 Azure platform
Licensing and Custom Solutions
If you’re looking for a customized solution, reach out at hello@buildstorm.com